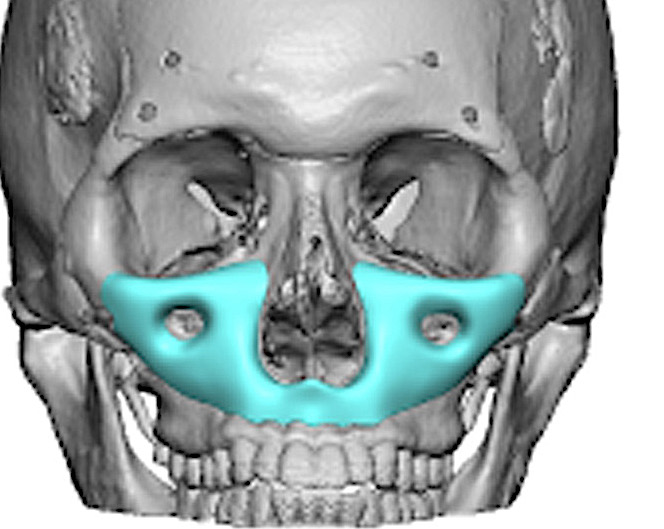

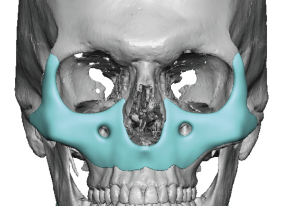
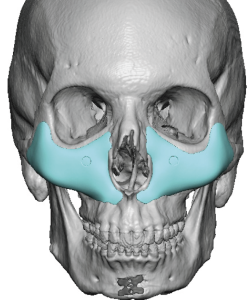
 Combined infraorbital–malar–maxillary augmentation represents a comprehensive skeletal reconstruction of the central and lateral midface. Commonly referred to as a custom midface mask implant, this technique restores deficient projection across the infraorbital rim, anterior maxilla, paranasal region, and zygomatic body in a single, continuous construct.
Unlike isolated infraorbital or malar implants, or even combined infraorbital-malar implant, the midface mask approach treats the midface as a unified topographic unit. It is indicated in moderate to severe skeletal retrusion, congenital hypoplasia, post-traumatic deformity, aging-related retrusion, and failed prior augmentation procedures.
This procedure is fundamentally structural. Its purpose is to normalize skeletal relationships and soft tissue drape rather than create volumetric fullness.
Indications
Aesthetic Indications
- Severe negative vector midface
- Combined infraorbital and malar deficiency
- Anterior maxillary retrusion
- Paranasal depression
- Global midface flatness
- Tear trough deformity with skeletal support loss
- Thin soft tissues overlying deficient bone
Reconstructive Indications
- Congenital midface hypoplasia
- Post-traumatic deformity
- Secondary correction after orthognathic surgery
- Revision of prior implant malposition or over-resection
Conceptual Framework
The midface mask implant is designed as a continuous skeletal augmentation plate that restores convexity across:
- Infraorbital rim
- Medial infraorbital transition
- Paranasal/anterior maxilla
- Zygomatic body
- Lateral malar prominence
Rather than adding projection at isolated points, the implant restores three-dimensional contour harmony.
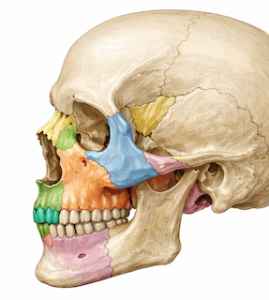
Anatomical Considerations
 Skeletal Units
- Infraorbital rim
- Orbital floor (anterior third)
- Anterior maxilla
- Pyriform aperture
- Zygomaticomaxillary buttress
- Zygomatic body
 Neurovascular Structures
- Infraorbital nerve
- Zygomaticofacial nerve
- Zygomaticotemporal nerve
- Angular vessels
- Facial artery branches
Soft Tissue Envelope
- Suborbicularis oculi fat (SOOF)
- Malar fat pad
- Orbicularis oculi muscle
- SMAS attachments
The implant must respect natural soft tissue glide planes and avoid abrupt skeletal transitions.
Preoperative Planning
Clinical Assessment
- Profile convexity analysis
- Oblique contour evaluation
- Globe-to-rim relationship
- Tear trough morphology
- Malar prominence deficiency
- Paranasal depression
- Asymmetry
Radiographic Planning
Three-dimensional CT imaging is mandatory.
Evaluate:
- Infraorbital rim retrusion
- Zygomatic projection deficit
- Maxillary concavity
- Orbital position
- Asymmetry patterns
Virtual surgical planning allows:
- Controlled sagittal projection mapping
- Infraorbital nerve relief design
- Differential thickness distribution
- Feathered edge planning
- Mirror-imaging for asymmetry
Implant Design Architecture
1. Continuous Topographic Design
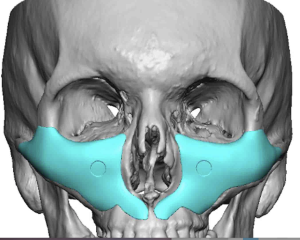 The implant should function as a single continuous contour augmentation from medial infraorbital rim to lateral zygoma. down to the tooth root level of the maxilla. In some patients the design may connect across the premsxilla (anterior base of the nose) while in others there may be a disconnect between the two sides.
 How far the implant design may extend out onto the zygoma/zygomatic arch and/or the lateral orbital rim is based on the patient’s aesthetic goals.
2. Zonal Distribution
Zone I: Infraorbital Rim
- 2–4 mm projection typical
- Provides lower eyelid support
- Must avoid “shelf” deformity
Zone II: Medial Infraorbital / Tear Trough
- Smooth convex transition
- No palpable edge
- Blended inferiorly
Zone III: Paranasal / Anterior Maxilla
- 4–6 mm typical projection
- Restores pyriform support
- Improves nasolabial angle
Zone IV: Zygomatic Body
- Enhances malar prominence,, 2 to 4mm typically
- Improves oblique facial aesthetics
- Must blend into posterior zygomatic arch arch
Zone V: Lateral Transition
- Feathered edge to 0 mm
- Prevents implant visibility/pa;lpability
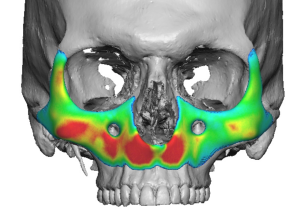
Projection Strategy
Projection must follow a gradual anterior sweep, not a focal protrusion.
Maximum projection typically occurs:
- Inferior to infraorbital rim
- Along zygomatic body
- Within paranasal depression
Overprojection risks:
- Lower eyelid stiffness
- Artificial fullness
- Visible implant edge
- Soft tissue tension
Thickness Distribution Principles
 Centralized maximal thickness zones
- Peripheral feathering to 0 mm
- Smooth inferior border taper
- Lateral blending into zygoma
- Medial blending into pyriform rim
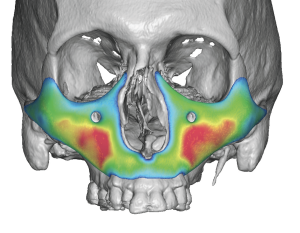 Centralized maximal thickness zones
Thin-skinned patients require conservative projection and extended taper transitions.
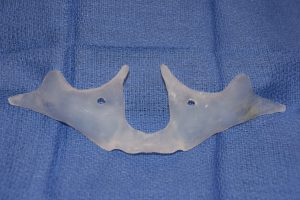
Implant Materials
Silicone
- Easily modifiable
- Easily reversible
- Best material for feathered edging
- Enables larger surface area coverage implants to be placed.
PEEK
- Structural rigidity
- Requires multi piece design for placement
- Some risk of edging particularly at orbital rim
- Limited implant size
Porous Polyethylene
- Tissue integration
- Difficult to reverse
- Need to stay well away from the infraorbital nerve area
- Limited implant size
- Too bulky
Custom CAD/CAM fabrication is required. No standard implants exist for this implant concept.
Surgical Technique
Anesthesia
General anesthesia with oral intubation.
Positioning
Supine with head elevation.
Surgical Approach
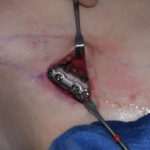
Intraoral (Primary)
- Extended upper gingivobuccal sulcus incision
- Subperiosteal dissection to infraorbital rim
- Medial exposure to pyriform aperture
- Lateral exposure to zygomatic body
Lower Eyelid (Adjunctive if needed)
- Transconjunctival or subciliary
- Used for superior visualization in large implants
Pocket Development
- Strict subperiosteal plane
- Wide exposure to allow for unimpeded implant placement
- Identification and protection of infraorbital nerve
- Lateral exposure of zygomatic body
Precise pocket development ensures stable seating without soft tissue interposition.
Implant Insertion
 Large midface mask implants are inserted intraorally with care to avoid infraorbital nerve compression. In some cases lower eyelid incisions may also be needed if there is significant lateral orbital rim and/or zygomayic arch extensions.
Steps:
- Medial positioning first
- Superior infraorbital seating
- Lateral zygomatic alignment
- Confirm flush bony contact
In some extended or large mask implants it may be necessary to section the implant, regardless of its metal composition, for safe placement.
Fixation
- Typically 2–3 titanium screws per side
- One infraorbital
- One paranasal
- One lateral malar (if extended)
Fixation helps with comperession/adapting the implant to the bone to lessen the thickness of the enveloping capsule.
Postoperative Management
- Head elevation
- Oral antibiotics
- Soft diet
- Avoid facial pressure
Recovery Timeline
- Significant swelling: 2 weeks
- Residual swelling: 6–8 weeks
- Final contour evaluation: 3–4 months
- Temporary numbness expected due to circumferential nerve dissection, will takes 4 to 6 weeks too resolve. common
Complications
- Infraorbital nerve paresthesia
- Zygomatic nerve paresthesia
- Implant malposition
- Infection
- Asymmetry
- Overprojection
- Visible edges in thin skin
Soft Tissue Dynamics
The skeletal expansion alters:
- SOOF position
- Malar fat drape
- Lower eyelid vector
- Light reflection patterns
The goal is restoration of natural convexity—not artificial fullness.
Asymmetry Correction
Custom implants allow:
- Differential zonal thickness
- Vertical rim leveling
- Unilateral augmentation
- Volume redistribution
Mirror imaging techniques enhance symmetry planning.
Aesthetic Philosophy
 The midface mask implant is reconstructive in principle.
Its objectives are:
- Restoration of skeletal architecture
- Improved lower eyelid support
- Balanced facial convexity
- Elimination of dependency on fillers
- Natural light transition across the midface
It should never create:
- Bulky midface fullness
- Shelf deformity
- Overly prominent cheek projection
- Visible contour lines
The most successful outcomes appear structurally normal rather than surgically augmented.
Dr Barry Eppley
Plastic Surgeon