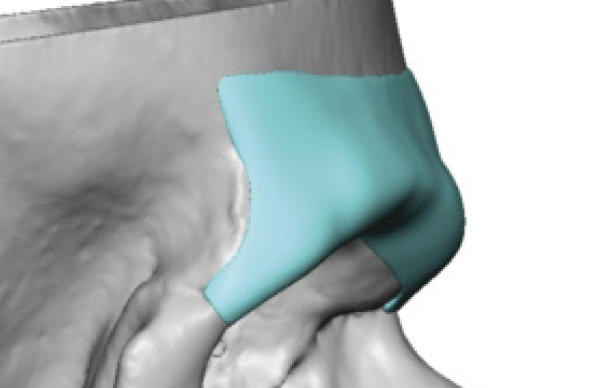

 Designing a custom brow bone implant from a CT scan is a very deliberate process—it’s not just “adding projection,” but engineering a smooth, stable transition across the forehead and brow while respecting the sinus underneath.
1. Overall Design Concept on CT
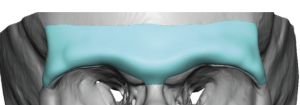
The implant is created as a 3D overlay on your existing bone:
Implant Footprint
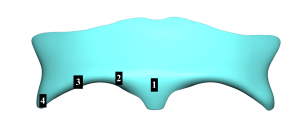 Typical coverage (five zones):
- Central glabella valley (1)
- Medial brow bone mound (2)
- Lateral brow bone mound/tail (3)
- Lateral orbital rim tail (4)
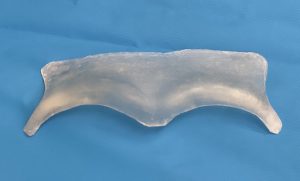
A well-designed implant often has a butterfly or eagle wing shape .
Think of it as a shaped contoured shell that restores projection rather than a bulky add-on.
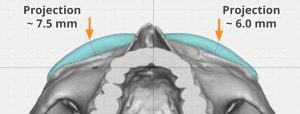
2. Thickness Profile (the most important feature)
 Thickness is not uniform—it’s carefully varied between five zones creating an ‘Eagle Wing’ appearance:
Central (glabellar valley)
- Typically: 2–3 mm (sometimes more in strong augmentations)
- This is where projection is needed the least, primary function is to connect the sides of the implant
Medial/Inner Brow Bone Mound
- 4-7mms
- Mound angles slightly downward towards the nose
Lateral/Outer Brow Bone Mound
- Thickness depends on the type of brow bone look the patient wants which may or may not exceed the medial brow bone prominence
- Blended appearance is less than of the medial brow bone mound
- A stronger hooded appearance requires a projection equal to or greater than that of the medial brow bone prominence
- Mound has a straight forward shape
- Tapers down to the frontozygomatic suture line
Superior taper (up into forehead)
- Feathers out to near zero thickness
- Creates a smooth transition with no visible edge
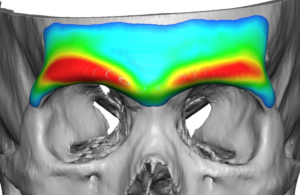 On CT, this looks like a gradient ramp, not a step.
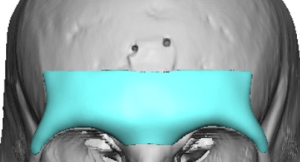
3. Edge Design (critical for natural results)
 Edges are one of the most important—and often underestimated—features.
Feathered / beveled edges
- Implant edges are ultra-thin and tapered
- Designed to “blend” into surrounding bone
No sharp borders
- Avoids:
- Palpability
- Visible ridges under thin skin
Wraparound contour
- Often curves slightly around the lateral orbital rim
- Helps create a natural masculine brow shape
On CT, the edges should look like they fade into the bone, not sit on top of it.
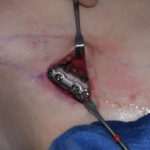
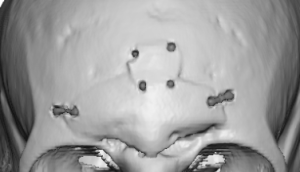
4. Fixation Points
Implants are typically rigidly fixed with small titanium screws.
Common fixation zones:
- Thicker bone areas away from the sinus, such as:
- Lateral orbital rim
- Usually 2 microscrews whose placement is controlled by incisional access (upper eyelid)
- Just enough to stabilize it low until it encapsulates
5. Relationship to the Frontal Sinus
 If prior setback was done:
- Implant is designed over the healed bone flap
- Must account for:
- Plate locations
- Bone thickness variations
6. Symmetry and Shape Control
The CT allows precise control of shape:
 Symmetry correction
- One side can be built up more than the other
Masculine vs neutral contour
- More prominent lateral brow = more masculine look
- Flatter contour = softer appearance
Transition zones
- Smooth blending into:
- Forehead above
- Lateral orbital rims below
7. Design Pitfalls (what good CT planning avoids)
Poor designs tend to show:
- ? Uniform thickness ? looks artificial
- ? Blunt edges ? visible/palpable
- ? Overprojection centrally ? “Neanderthal” look
- ? Inadequate blending into the forehead and lateral temporal bony lines
Bottom Line
A well-designed custom brow implant on CT should:
- Has differing thicknesses across the brow ridge
- Feature feathered, nearly invisible borders
- Be securely fixated in safe bone zones
- Respect frontal sinus anatomy
- Create a smooth, natural contour—not a bolted-on ridge
Dr. Barry Eppley
Plastic Surgeon