
Reverse otoplasty refers to partially or fully undoing an overcorrected ear-pinning surgery so the ear sits a bit farther from the head again. While an overcorrected car from otoplasty surgery is ultimately determined by the patient there are some measurable guidelines for the natural angulation of the ear from the side of the head (auriculocephalic angle)
When is an ear overcorrected (by the numbers)?
The normal auriculocephalic angle is:
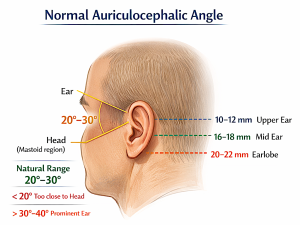
? ~20° to 30°
This is the angle between:
- the posterior surface of the auricle (ear)
- and the side of the head (mastoid region)
Clinical context
- < 20° ? ear appears too close to the head (overcorrected otoplasty)
- 20–30° ? considered natural / aesthetic range
- > 30–40° ? ear appears prominent (classic otoplasty indication)
Additional reference
Surgeons also look at helical rim–mastoid distance:
- ~10–12 mm (upper pole)
- ~16–18 mm (mid ear)
- ~20–22 mm (lobule)
These measurements complement the angle and help define a normal ear projection.
If you’re evaluating reversal otoplasty cases, that 20–30° range is typically the target when re-establishing projection.
In general, the basic idea is:
- release the over-bent/overfolded cartilage,
- then use a spacer or graft to keep the ear from collapsing back in, because scar tissue and cartilage memory tend to pull it inward again.
Timing matters. Early after the original otoplasty, limited reversal may sometimes be done more simply, but after roughly 6 to 8 weeks surgeons may need structural support such as a graft/spacer rather than simple release alone.
Case Example
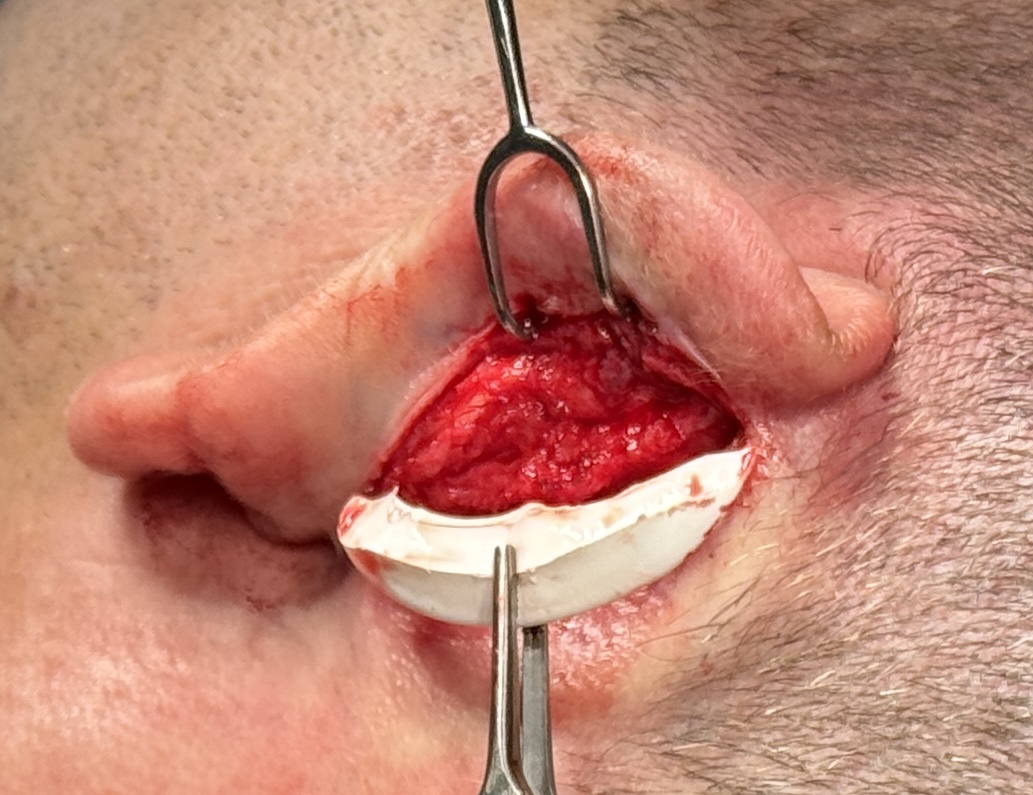
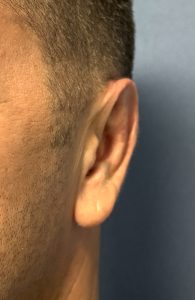 This male has a significant loss of the auriculocephalic angle due to a prior otoplasty in which both cartilage anf skin were removed. The auriculocpehalic angle was essentially 0 degree. His easrs were completely flattened along the side of his head on both sides. The ear lobes stuck out further than the cartilage frame above it.
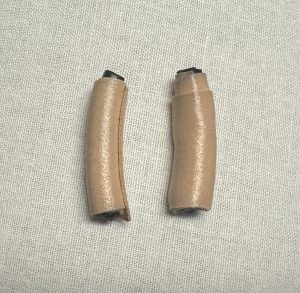
 He placed handmade inserts behind the ear to simulate the amount of increased projection of the ears he desired. The ‘wedge’ measured 25mm long and 7mms in diameter. These wedges marked the location of the relase and interpositonal material placement (white arrow = max projection area, yellow lines = upper anf lower limits of wedge placement.
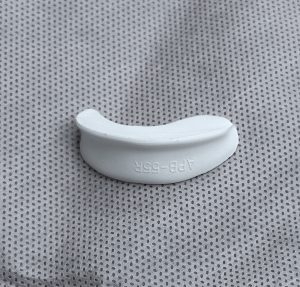
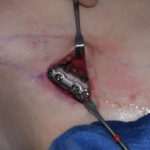
 Under local anesthesia the incisions wer reopened and releases done at the constricted antihelical fold and under also under the concha. A postauricuakar ePTFE ear wedge was used as a spacer material and was cut in similar dimensions as his handmade wedges.
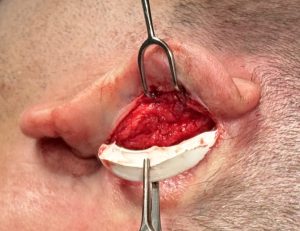
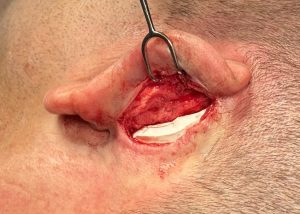 Because it was an implant material and maximum sodft tissue coverage over it is desired it weas palced inder the conchal release. A three layer resorbabole suture was done over it.
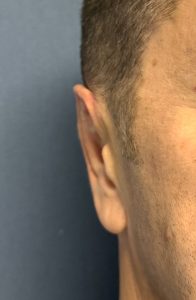
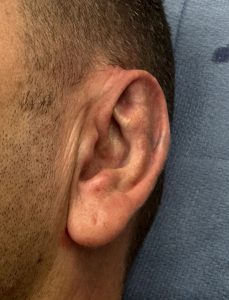 The improvement in the ear projection was visible and was exactly like he wanted….visible but not too much.
Discussion
In general, the basic idea is:
- release the over-bent/overfolded cartilage,
- then use a spacer or graft to keep the ear from collapsing back in, because scar tissue and cartilage memory tend to pull it inward again.
Timing matters. Early after the original otoplasty, limited reversal may sometimes be done more simply, but after roughly 6 to 8 weeks surgeons may need structural support such as a graft/spacer rather than simple release alone.
Here are the main surgical techniques for otoplasty reversal (i.e., correcting an overpinned ear):
Otoplasty Reversal Techniques
1. Suture Release (Early / Mild Overcorrection)
- Removal or cutting of prior Mustardé or Furnas sutures
- Allows the ear cartilage to rebound outward
Best for:
- Early cases (weeks after surgery)
- Mild overcorrection
Limitation:
- Often unpredictable due to cartilage memory and scar contracture
2. Cartilage Scoring / Release
- Posterior cartilage is incised or weakened
- Releases the forced antihelical fold or excessive setback
Use:
- When cartilage stiffness is contributing to the deformity
3. Interpositional Spacer Grafts (Most Reliable Method)
This is the key technique in true reversal cases
Types of spacers:
- Rib cartilage grafts (autologous)
- Rib cartilage grafts (cadaveric)
- Synthetic implants
Placement:
- Between posterior auricle and mastoid periosteum
Purpose:
- Physically push the ear outward
- Prevent recurrence from scar contraction
? This is often considered the most effective technique in established cases.
4. Postauricular Fascial or Soft Tissue Interposition
- Uses local tissue (fascia, scar tissue)
- Acts as a biologic spacer
Less rigid than cartilage grafts, so:
- Useful for minor adjustments
- Less reliable for significant reversal
5. Conchal-Mastoid Angle Reconstruction
- Re-establishes a normal auriculocephalic angle (20–30°)
- May combine:
- suture release
- grafting
- reshaping cartilage
6. Composite Reconstruction (Severe Cases)
Used when:
- Ear is severely stuck to the head
- Prior surgery caused distortion or loss of normal anatomy
May involve:
- Full cartilage release
- Structural graft framework
- Rebuilding antihelical fold + projection
?? Key Principles in Reversal
- Scar tissue dominates ? simple release alone usually fails
- Cartilage memory pulls ear back in
- Spacer support is critical in most delayed cases
- Goal = restore:
- 20–30° auriculocephalic angle
- natural contour, not just projection
Practical Takeaway
- Early (<6–8 weeks): suture release may work
- Late (>2 months): almost always requires spacer grafting
- Severe cases: need structural reconstruction
Dr Barry Eppley
Plastic Surgeon