
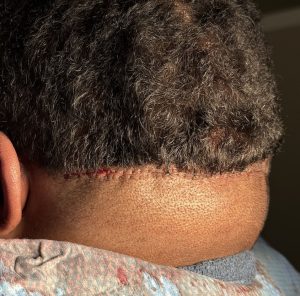
Scalp roll excision is designed to remove a redundant fold (“roll”) of skin along the posterior scalp or upper neck, most commonly in the occipital region. These folds may present as single, double, or—less commonly—triple rolls. Successful elimination of the rolls and restoration of a smooth posterior head contour depends primarily on accurate preoperative markings.
Step-by-Step Preoperative Marking Algorithm
1. Patient Positioning
- Patient upright, either standing or seated
- Head in a neutral position (neither flexed nor extended)
- Hair clipped only if necessary (often not required)
Important: Never mark the patient in the supine position. Scalp rolls may diminish or disappear when lying down, increasing the risk of over-resection.
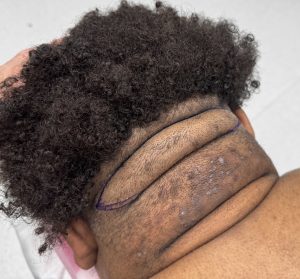
2. Identify the Dominant Roll
- Identify the most prominent horizontal roll
 Mark the superior and inferior borders of the dominant roll, extending laterally to the limits of the anticipated resection (single-roll cases)
 Mark the superior and inferior borders of the dominant roll, extending laterally to the limits of the anticipated resection (single-roll cases)
Multiple rolls:
- Double rolls: Decide whether to excise the inferior roll alone or to remove half of each roll (lower half of the upper roll and upper half of the lower roll) or even both rolls in their entirety.
- Triple rolls (rare): Decide whether to excise the central roll with partial excision of the upper and lower rolls, or to excise the larger inferior roll with partial excision of the intermediate roll.
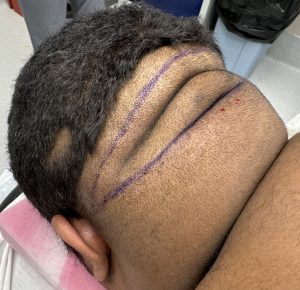
3. Define the Inferior Incision
- Mark the deepest natural crease at the base of the roll
- This crease serves as the anchor line and approximates the final scar location
- Keep the inferior incision slightly below the midpoint of the roll rather than centered
Rule: Scars are better concealed below a roll than above it.
4. Determine Excision Width
- Perform a vertical pinch test using the thumb and index finger
- Allow the skin edges to meet naturally without force
- Mark the superior incision line at the point where the fingers meet
This usually encompasses the entire roll.
Typical safe excision widths:
- 2.0–3.0 cm in most patients
- Larger resections are often possible in double- and triple-roll cases
5. Plan the Lateral Extent
- Extend markings only to the point where the roll is visibly present
- Taper both ends into a gentle fusiform ellipse
- Maintain a length-to-width ratio of approximately 3–4:1 to avoid dog-ear formation
6. Confirm Symmetry
Reassess and adjust as needed:
- Distance from the occipital midline
- Depth and position of the inferior crease on both sides
Asymmetric laxity is common and should be anticipated.
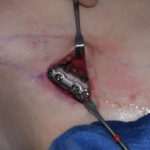
7. Closure
- Perform a layered closure with the deep galeal layer bearing most of the tension
- Use a more superficial deep layer for alignment beneath the hair follicles
- Avoid dermal sutures, as they may compromise hair follicles
- Close the skin with a running 5-0 plain suture, beveled above the hair follicles
 Close the skin with a running 5-0 plain suture, beveled above the hair follicles
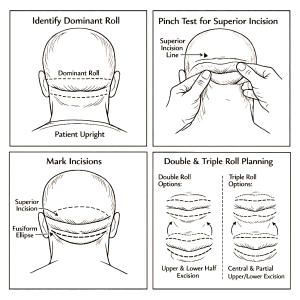 Key Safety Principles
- Mark upright only
- The inferior crease determines the final scar location
- Use the pinch test to dictate excision width
- When uncertain, under-resect
- Secondary excision can always be performed later
Optional Refinements
- Staged excision for very thick rolls or patients at higher risk for scarring
- Beveled incisions to preserve hair follicles
- Progressive tension sutures during layered closure
Dr. Barry Eppley
World-Renowned Plastic Surgeon