
Introduction
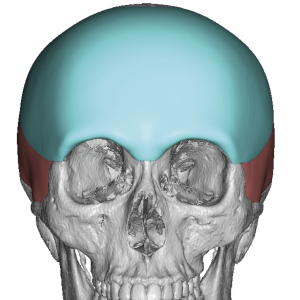
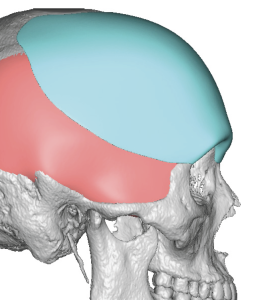 Custom forehead implants are designed to enhance or reshape the forehead and brow region—often to achieve aesthetic balance or for gender-affirming purposes. These implants are individually fabricated from silicone or PEEK (polyether ether ketone) using a 3D CT scan of the patient’s skull, ensuring a precise fit that follows the natural contours of the forehead.
Key Benefits:
-
Perfectly matches each patient’s unique anatomy.
-
Provides a permanent and stable result.
-
Corrects forehead asymmetry, flatness, or brow contour irregularities.
-
Can be combined with other custom facial implants (e.g., cheeks, jawline) for complete facial harmonization.
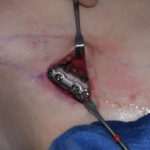
To achieve these benefits, exact positioning of the implant on the bone is essential. The implant must be placed to mirror the planned design from the patient’s 3D CT model. Although this sounds straightforward, placement is performed through a relatively small incision—often smaller than the implant’s width—limiting direct visualization. Only a small portion of the implant is visible during insertion, while the area that most affects forehead contour remains unseen. Achieving correct midline alignment and avoiding tilt or cant, therefore, requires more than visual estimation. This makes the use of an intraoperative implant positioning guide invaluable.
Surgical Technique
a) Incision & Access
-
The implant is typically inserted through a small scalp incision positioned just behind the hairline (retro-hairline).
-
A subperiosteal pocket is then carefully created over the frontal bone—and, when necessary, extended laterally over the temporal bone—to accommodate the implant.
b) Placement & Positioning
-
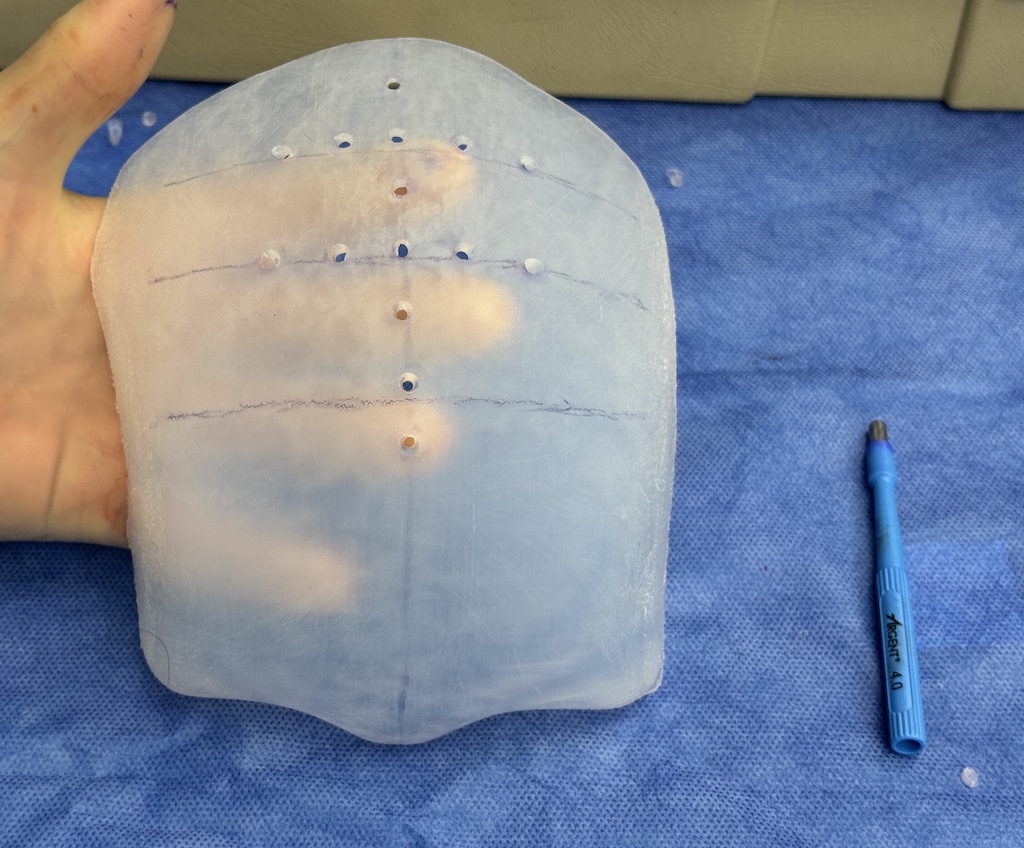
 Implant preparation: Before insertion, the implant is marked at the midline and along two horizontal rows corresponding to areas that will lie behind the hairline.
 -
Guide creation: Using a 4 mm dermal punch, full-thickness holes are made along these markings. These serve as “compass” alignment points, visible through the incision during placement.
-
Insertion: The custom implant is gently passed through the incision and positioned on the bone. All implant edges must lie completely flat—an indicator that the pocket has been properly sized and contoured.
-
Alignment: Using the “compass” markings, the surgeon ensures the implant is centered along the midline without lateral tilt or cant.
-
Fine adjustment: Minor repositioning can be achieved by inserting the tip of an instrument (e.g., a hemostat) into one of the guide holes and using it as a joystick for controlled movement.
-
Fixation: Once ideal positioning is confirmed, double-point fixation is achieved using self-tapping screws placed through the implant into the underlying bone.
 Implant preparation: Before insertion, the implant is marked at the midline and along two horizontal rows corresponding to areas that will lie behind the hairline.
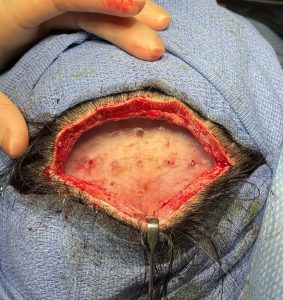 Insertion: The custom implant is gently passed through the incision and positioned on the bone. All implant edges must lie completely flat—an indicator that the pocket has been properly sized and contoured.
 Fine adjustment: Minor repositioning can be achieved by inserting the tip of an instrument (e.g., a hemostat) into one of the guide holes and using it as a joystick for controlled movement.
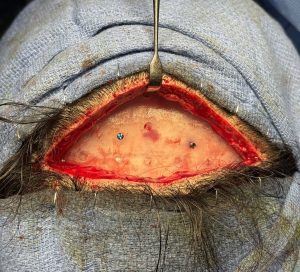 Fixation: Once ideal positioning is confirmed, double-point fixation is achieved using self-tapping screws placed through the implant into the underlying bone.
Discussion
The success of any custom craniofacial implant depends equally on design precision and accurate intraoperative placement. While implant design benefits from complete preoperative visualization and control, placement is inherently limited by restricted access and visibility. Therefore, visual aids—such as marking systems or placement guides—are essential to replicate the planned positioning during surgery and to ensure optimal aesthetic outcomes.
Dr. Barry Eppley
World-Renowned Plastic Surgeon