
Placing a custom skull implant overlay on top of an existing skull implant is possible — but it requires careful analysis and is not a routine situation. The approach depends heavily on what the first implant is, how it was placed, and why additional augmentation is needed.
Here is a structured breakdown:
1. When Would This Be Done?
Common reasons:
1. Under-correction
- Original implant did not provide enough projection.
- Patient wants more augmentation, often only realized secondarily..
2. Contour refinement
- Minor asymmetries remain.
- Edge blending needs improvement.
3. Secondary aesthetic change
- Patient desires a new shape years later.
4. Partial implant correction
- Instead of removing the original implant.
2. Critical Question: What Is the First Implant?
This determines feasibility.
A. Solid Silicone (most common in cosmetic skull augmentation)
- Overlay is possible
- Often easier to revise
- Must evaluate:Thickness of first implant, stability and fixation and soft tissue stretch capacity
B. PEEK
- PEEK is rigid and reauires a much larger scalp incision to place
- Edging can be a concern since it is a machined or milled implant
- stacking PEEK skull is rarely a good idea
3. Major Design Considerations
A. Stability
You cannot simply “stack” implants loosely.
The overlay must:
- Be custom-designed over the exact contour of the first implant
- Be screw-fixated to bone (not just to the first implant)
Anchoring only into the first implant is not ideal.
B. Soft Tissue Envelope Limits
The scalp has finite stretch.
Key risks:
- Excess tension ? wound healing problems
- Increased seroma risk
- Increased infection risk
- Edge visibility
Generally:
- Total augmentation thickness beyond ~12–15 mm combined becomes riskier depending on scalp laxity.
C. Implant Edge Management
Stacking implants can create:
- Step-offs
- Palpable ridges
- Edge show through
A properly designed overlay must:
- Feather beyond the first implant edges
- Smoothly blend with surrounding bone
This requires high-resolution CT modeling.
4. When Removal + Redesign Is Better
In many cases, it is cleaner to:
- Remove the original implant
- Design a single new implant with the total desired projection
- Replace it
Advantages:
- Fewer interfaces
- Less infection risk
- Cleaner contour
- Less long-term complication potential
Stacking implants is usually a secondary option when:
- Removal is undesirable
- First implant is integrated or complex to remove
- Only small additional augmentation is needed
5. Risks Increase With Stacking
Compared to a single implant, layered implants increase:
- Fluid accumulation risk
- Palpability
- Pressure on scalp
- Long-term shifting potential
That said, in experienced hands and with proper design, it can be done safely in selected cases.
6. Good Indications for Implant Stacking
The safest version of this approach is:
- First implant: well-positioned, thin-to-moderate thickness
- Overlay thickness: moderate(8–10 mm)
- Custom CT-based design
- Screw fixation into skull
- Excellent scalp elasticity
7. When It Should Be Avoided
- Scalp is tight
- Previous wound healing issues
- Infection history
- Very thick original implant
- Desire for major additional projection (>8–10 mm)
In those cases, full replacement is more predictable.
Case Study
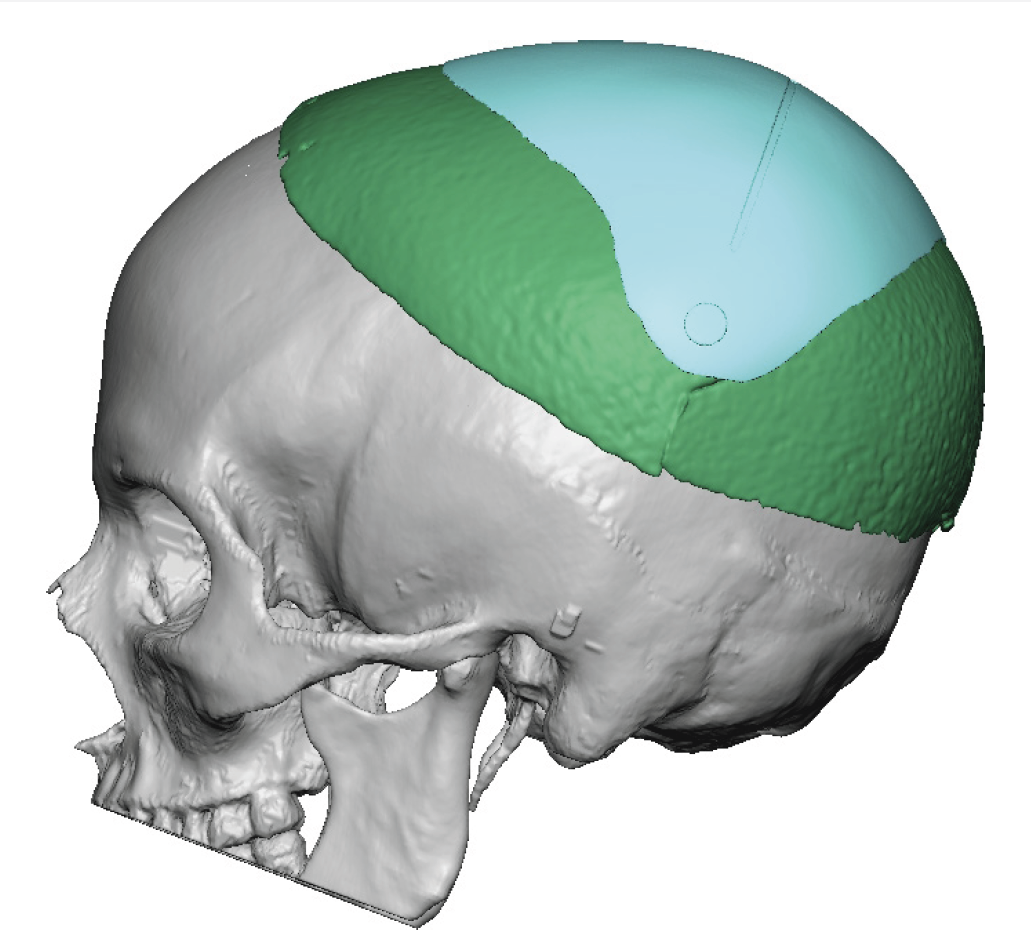
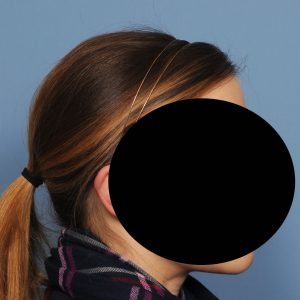
This thin female desired a skull augmentation that added overall height to the top and back of the head. A custom skull implant of 170ccs was placed through a staged two implant approach with uncomplicated healing. In a thin Caucasian female an implant of that size would not be able to be placed due to the limited scalp stretch. In the second stage the now larger implant was placed in two pieces.
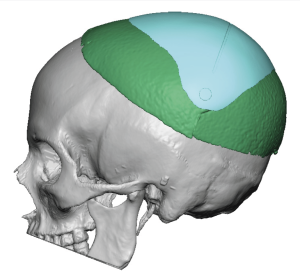
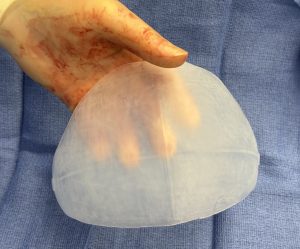
 Five years later she returned for some additional augmentation in the crown area. Because the existing size of the indwelling implant and the small incisions used to place it a removal and replacement approach was not advised. An overlay implant was designed for the additional 6mm of skull height desired and 60ccs of volume. (green color = indwelling or base implant, teal color =overlay implant)

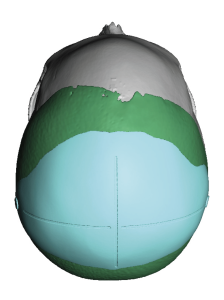
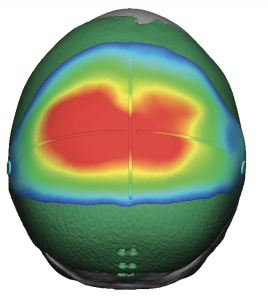 The color thickness mapping showed where the additional projection was primarily located.
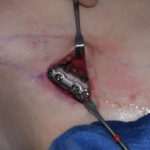
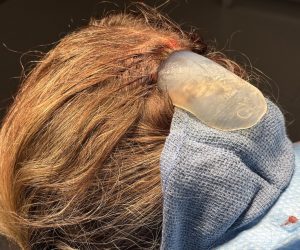 Under general anesthesia in the prone position a small portion of her original back of the head incision was used for the overlay implant insertion. To keep the incision small the implant was rolled for insertion. The challenge is once the implant is inside the pocket getting it fully unrolled, properly oriented and then in the correct front to back positioning… and doing so in a blinded fashion.
 Not easy but with a lot of experience can be successfully done.
Discussion
When discussing maximum safe total thickness for a skull implant — especially in a revision case where an overlay may sit on top of an existing implant — the limiting factor is almost never the skull. It is the scalp soft tissue envelope and its vascularity.
Here is how it is best understood clinically.
1. The True Limiting Structure: The Scalp
The scalp has:
- Limited elasticity
- Fixed blood supply pattern
- Prior scar tissue in revision cases
- Variable thickness (thinner over the vertex, thicker posteriorly)
Excessive total projection increases:
- Closure tension
- Vascular compromise
- Seroma risk
- Infection risk
- Edge visibility
- Long-term thinning
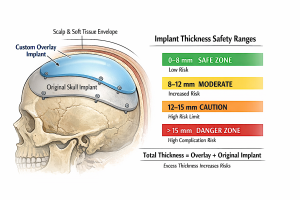 2. General Thickness Guidelines (Total Combined Thickness)
These are practical, experience-based ranges:
- 0–8 mm total
Very safe range
Low risk of soft tissue compromise in most patients.
- 8–12 mm total
Moderate range
Usually safe in primary cases with good scalp laxity.
Careful evaluation required in revisions.
- 12–15 mm total
Upper practical limit in most patients.
Only appropriate if:
- Excellent scalp laxity
- No prior healing issues
- Good vascularity
- Gradual feathered design
- >15 mm total
High-risk zone.
Increases:
- Wound dehiscence risk
- Pressure thinning
- Implant visibility
- Long-term scalp stretch problems
Beyond ~15–18 mm, complication rates increase noticeably.
3. Revision / Overlay Cases
If there is already an implant present:
- You must consider combined thickness, not just the new overlay.
- Scalp has already been stretched once.
- Scar tissue reduces elasticity.
- Vascularity may be slightly compromised.
In revision cases, the practical safe ceiling is often:
? 10–12 mm total combined thickness
Even if the original implant is 8 mm, adding another 6 mm (total 14 mm) may push the envelope too far depending on scalp condition.
4. Location Matters
Different areas tolerate different thicknesses:
|
Area |
Tolerance |
|
Occipital |
Highest tolerance |
|
Parietal |
Moderate |
|
Vertex |
Lower |
|
Forehead |
Lower (thinner soft tissue) |
|
Temporal |
Lowest |
Occipital augmentation can often safely tolerate more thickness than the anterior scalp.
5. Other Critical Factors
A. Scalp Thickness
Thin scalp = lower tolerance.
B. Prior Surgery
Each surgery reduces elasticity.
C. Tension-Free Closure
If closure requires significant force, thickness is too much.
D. Implant Edge Design
Sharp transitions increase visibility risk even at moderate thickness.
6. When Replacement Is Better Than Stacking
If desired total thickness exceeds ~12–15 mm:
It is often safer to:
- Remove the old implant
- Replace with one new properly designed implant
Rather than stacking to achieve large projection.
7. Long-Term Consideration
Excess thickness can cause:
- Progressive scalp thinning over years
- Delayed edge show
- Pressure-related skin issues
Even if early healing is fine.
Practical Summary
For most patients:
- Ideal total thickness: 6–10 mm
- Upper safe limit (primary case): ~12–15 mm
- Upper safe limit (revision/overlay case): ~10–12 mm
- >15 mm total: increasingly higher risk
Dr. Barry Eppley
Plastic Surgeon