

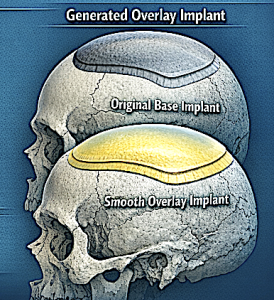
A custom skull implant overlay (sometimes called a “topper implant” or stacked skull implant) is a secondary implant designed to sit on top of an existing skull implant to increase projection or refine contour without replacing the original implant.
Concept
- The original implant acts as the base implant that establishes the footprint on the skull.
- A secondary overlay implant is designed to fit precisely over that base implant within the same boundaries.
- It adds extra thickness/volume only where more projection is desired.
When It Is Used
Common indications include:
- Patient wants more skull projection after a previous implant
- Contour refinement in a localized area
- Avoiding removal of a well-positioned base implant.
Design Characteristics
Typical features of an overlay implant:
- Custom-designed from CT data to match the base implant contour
- Limited footprint (stays within the borders of the original implant)
- Usually thinner than the base implant
- Often adds ~4–6 mm projection or ~25–33% more volume depending on scalp tolerance.
Surgical Considerations
Key technical points:
- Existing implant pocket must accommodate additional volume
- The capsule around the implant usually stretches enough to allow ~25–33% additional volume
- The overlay sits directly on top of the base implant and is secured if needed.
Advantages
- Avoids removal/replacement of the original implant
- Shorter surgery than full implant exchange
- Allows incremental augmentation of skull contour
bony

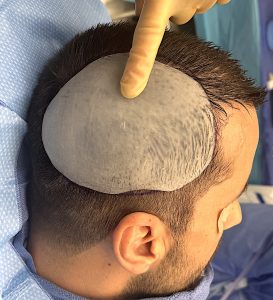
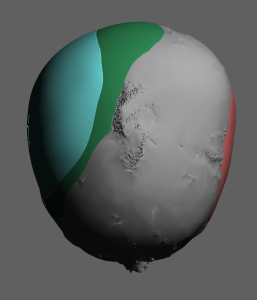 This male had a large surface area custom skull implant placed to treat a significant plagiocephaly. Due to the temporo-parietal bony prominence on his left side the skull implant did not completely match it on the right side. As a result an overlay skull implant was designed to help better match the right side to the left (base existing implant in green color, the overlay implant design in teal color)
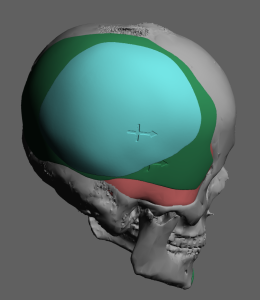 The overlay or topper skull implant had a footprint that stayed inside that of the base implant with a peak projection of 4mm at the height of the temporo-parietal curve. The overlay implant added 50cc volume to a base implant volume of 102ccs.
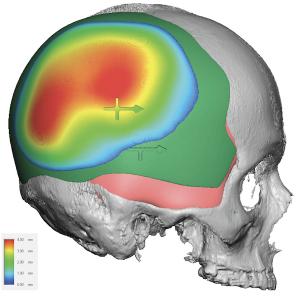 The maximum projection of an additional 4mms is added to the contour to match the opposite side usiong a mirroring design technique.
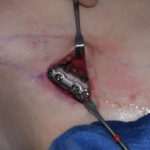
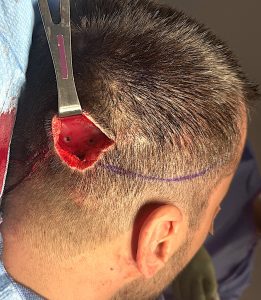 Under general anesthesia ands through a small incision along an existing hair transplant donor scar the implant was placed and secured with two microscrews.
Discussion
For custom skull implant overlays, thickness and volume are primarily limited by scalp stretch capacity and implant pocket compliance rather than bone anatomy. In most revision or staged augmentations, planning follows several practical rules.
1. Typical Thickness Limits
Overlay implants are usually thinner than the original implant.
Why limits exist
- Scalp elasticity
- Risk of wound tension
- Edge visibility
- Pressure on scalp circulation
Occipital areas tolerate the greatest thickness because:
- thicker soft tissue
- larger scalp mobility.
2. Volume Increase Rule (Most Important)
A reliable surgical guideline:
Overlay implants should usually not exceed 35% to 50% of the original implant volume.
Example:
|
Base Implant Volume |
Safe Overlay Volume |
|
100 cc |
35–50 cc |
|
150 cc |
50–75 cc |
|
200 cc |
75–100 cc |
Reason:
- The capsule around the implant will typically stretch only about half or less of the original volume without creating closure problems.
3. Edge Design Rules
Overlay implants must feather into the base implant.
Typical CAD rules:
- Edge thickness: 0–0.5 mm
- Feather taper zone: 8–15 mm
- Overlay footprint must stay well within base implant borders
Extending beyond the base implant edge risks:
- step deformities
- palpability
- edge palpability/visibility.
4. Scalp Stretch Assessment
Three practical ways I estimate capacity:
A. Time since original implant
- <6 months ? limited stretch
- 6–12 months ? moderate
- 12 months ? maximal capsule expansion
B. Manual scalp mobility test
Pinch and translate scalp over implant.
Typical safe movement:
- 1–1.5 cm mobility allows most overlays.
5. Overlay vs Full Replacement Decision
Overlay works best when:
|
Situation |
Overlay |
Replace Implant |
|
Need +3–6 mm projection |
? |
|
|
Need +8–12 mm |
? |
|
|
Shape refinement |
? |
|
|
Implant malposition |
? |
|
|
Large footprint change |
? |
6. Typical Overlay Example
Occipital implant case:
Base implant
- Thickness: 12 mm max
- Volume: 160 cc
Overlay plan
- Thickness: 5 mm max
- Volume: 40–50 cc
- Feather edge: 10 mm taper
Result
- Total projection: 17 mm
7. Common Planning Mistake
Designing overlays too small in footprint but too thick in center.
This creates:
- dome appearance
- scalp tension hotspot.
Better approach:
- increase footprint slightly
- reduce peak thickness
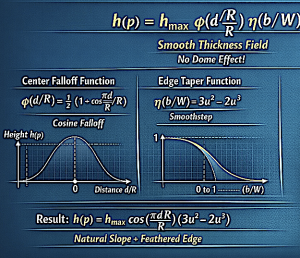
 While there are complex design formulations that help create a natural curvature to the overlay implant, there are some simple rules that I use for basic overlay implant planning:
Overlay thickness usually equals 30–50% of the original implant thickness, and volume should usually stay below half, and preferably only 1/3 than that of the base implant volume.
Dr. Barry Eppley
Plastic Surgeon