

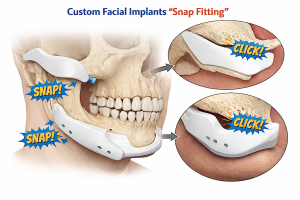
 Some surgeons falsely allege and some patients erroneously assume that a custom facial implant just snaps into place because of its design with an underlying shape that mimics the surface anatomy of the bone on which is placed. There is also the mistaken belief that certain implant materials (aka PEEK) are better because of this perceived ‘snap fit’ property…which is not true. All custom implants regardless of the material present the same challenge when it comes to their surgical placement…one smooth surface against another…with few if any true engagement areas. As a result the risks of implant malposition is fairly similar no matter what the implant material is.
Since custom facial implants simply don’t snap into place, how is implant position assessed intraoperatively beyond just “eyeballing”.
Having done several thousand custom facial implant placements, revisions and adjustments here are several techniques I use to verify implant position beyond just looking at it. These are important as in most custom facial implants only a portion of the implant is seen due to incisional limitations. It is not as simple as placing the implant on a skeletal model. In real world surgery you have to become a master of working with ‘what you can’t see as much as what you can see’.
What I am really checking
Intraoperatively, I am trying to confirm three things at once:
- The implant is seated on bone exactly where the implant design intended
- It is symmetric relative to the other side / midline
- It is fixed without rotation, rocking, or soft-tissue distortion
For facial implants in general, that starts with a precise subperiosteal pocket, identification of key nerves, and then rigid fixation once the implant is in the intended spot. Poor cosmesis is often a malposition problem, so avoiding asymmetry is a major technical goal.
The practical checks are:
1. “Seat feel” and rock test
A custom implant that matches the bone well often has a characteristic feel when it is fully down on the cortex. The surgeon will press on multiple points to see whether it rocks, teeters, or lifts at an edge. If it rocks, something is off: the pocket may be too tight in one area, there may be soft tissue interposed, or the implant may be rotated.
2. Landmark matching
Instead of trusting the whole surface at once, surgeons match the implant to a few high-value bony landmarks:
- chin: midline symphysis, inferior border, mental foramina
- jawline: mandibular angle, inferior border, posterior border of the ramus / external oblique region
- cheek: zygomatic buttress, infraorbital rim relationship, malar eminence
- forehead: bony temporal lines, glabella and tail of the brow bone
This is why chin implants usually feel the most “single-position,” jawline implants are highly guided but still allow tiny adjustments, and cheek implants require the most interpretive placement. The anatomy itself is more constraining in the chin than in the malar region.
3. Temporary fixation before final fixation
A common technique is to hold the implant in the planned position with a clamp, a temporary screw, or a first “pilot” fixation point, then reassess:
- frontal view
- worm’s-eye / basal view
- direct palpation along the borders
Only after that are the remaining screws placed. This reduces the chance of locking in a slight rotational error.
4. Midline and bilateral reference measurements
For chin and jaw work, I verify with direct measurement rather than pure visual judgment:
- distance from implant edge to dental or bony midline
- distance from each side to a shared reference point
- equality of vertical level on the right and left
On long jawline implants, even a few millimeters of rotation can change the visible angle and width, so these measurements matter.
5. Finger palpation through the soft tissue envelope
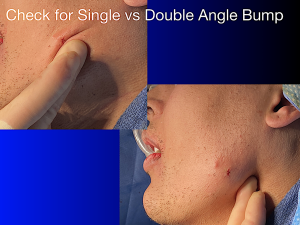 This sounds simple, but it is important. Surgeons palpate externally to feel:
- whether the inferior border is smooth
- whether there is a step-off
- whether one side projects more than the other
- whether the implant edge is too high, too low, too anterior, or too posterior
That tactile check is especially useful when swelling or limited exposure makes direct visual comparison less reliable.
6. Sizers vs printed models
While with standard facial implants there are intraoperative sizers that are available to be used, no such sizers exist for custom facial implants. In lieu of actual intraoperative sizers I have 3D printed plastic models of the implant made to assess the details of the implant before surgery. While these printed models can not be used in surgery (not sterile and will melt if sterilized) they do provide an intraoperative visual guide based on the negative impression of the underlying bony anatomy on the inside of the implant.
7. Endoscopic visualization
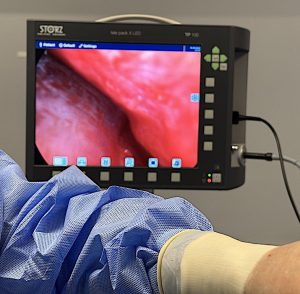
In areas where exposure is limited—especially the mandibular angle or forehead—an endoscope can be used to directly inspect some of the implant surfaces. That helps confirm that the implant is flush on bone rather than tented up by incomplete dissection or soft tissue.
8. Built-in design aids
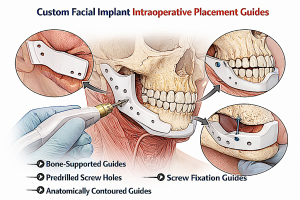
With patient-specific implants, accuracy is often improved before the case even starts by designing:
- predrilled screw holes
- bone-supported drilling guides
- orientation tabs
- contact surfaces keyed to unique anatomy
Such patient-specific guides and implants improve transfer of the much plan into the operating room. In more advanced cases, drill guides or custom fixation points are what really make the implant land where it was planned, not just the implant shape alone.
9. Navigation, mixed reality, or intraoperative imaging
- intraoperative navigation
- mixed-reality overlays
- intraoperative CT / 3D imaging
Those tools are not yet available to be used in aesthetic implant surgery as these surgeries are performed in free standing surgery centers where such imaging methods are not available.
How this differs by area
Chin
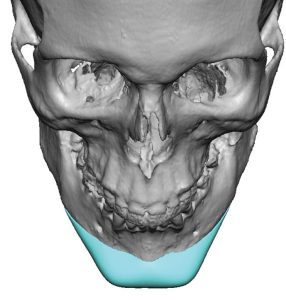
- easiest place to verify against the facial midline
- inferior border and symphyseal contour give strong tactile feedback
- mental nerve position provides an anatomic boundary
- surgeons often check that both sides wrap evenly and the implant is not canted
So chin verification is often a mix of midline measurement + border palpation + symmetry check. StatPearls emphasizes exposure along the inferior border and identification of the mental foramen/nerve, which are central to safe, accurate positioning.
Jawline
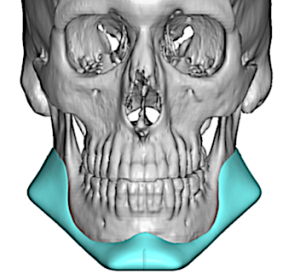
- harder because the implant is longer and the angle is posterior
- one end can look perfect while the body is slightly rotated
- verification relies more on angle seating, inferior border smoothness, and posterior visualization
- endoscopic assistance can be particularly useful here
Cheek / malar
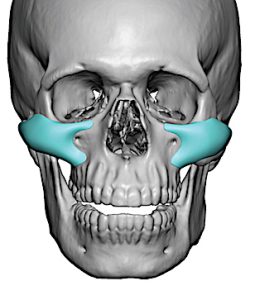
- the broad smooth surface gives less “self-locking” feedback
- surgeons rely more on landmark relationships, pocket adequacy, symmetry, and fixation
- sizers and models are especially helpful here, and fixation helps prevent drift after placement
Forehead / brow bone
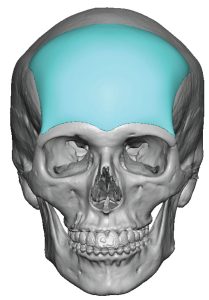
- there is no self-locking feedback at all except the inferior ‘stop’ provided by the overlying soft tissues of the brow bone, which is only useful if the forehead implan design goes down that far
- the side to side and superior to inferior placement of forehead implants must be completely by feel
- brow bone implants often use an upper eyelid incision to visually see the ‘legs of the implant along tail of the brow bone
The subtle part that matters most
A lot of precision is actually determined before the implant is inserted:
- how accurately the CT-based plan was done
- whether the implant design references good landmarks
- whether the dissection pocket matches the designed footprint
- whether the fixation strategy prevents rotation
So the “clever trick” is often not a single intraoperative move. It is a workflow: virtual plan – guided exposure – controlled seating – temporary check – rigid fixation. That is why custom implants can feel very precise without ever literally snapping into place.
Dr. Barry Eppley
Plastic Surgeon