
 Forehead augmentation with an implant is a proven method to produce an affective and permanent shape change to the broad surface area of the upper third of the face. Females generally prefer a vertical forehead inclination with a more convex forehead shape. This aesthetically creates a youthful and and more pleasing upper facial appearance. To provide some modest to moderate convexity for a flatter forehead a standard off-the-shelf forehead implant has been created for this specific type of aesthetic forehead change.
While this is not a forehead implant that can only used in females, its use in men is much more limited given their often different aesthetic forehead shape objectives .
1. Preoperative Implant Selection
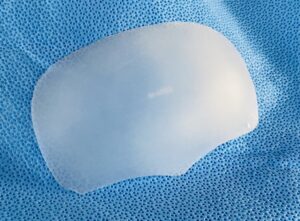
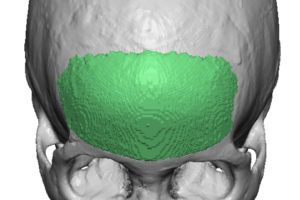
 Preoperative computer imaging is considered a valuable preoperative assessment to understand the patient’s aesthetic forehead goals and whether the procedure can achieve an outcome that is fairly similar. Such imaging is also helpful to determine what amount of projection increase the patient may desire. The female forehead implant comes in three sizes with similar maximum projections (4.5mm) situ with different foot print sizes to help treat a wide range of different patient forehead sizes.
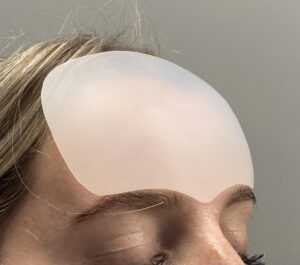
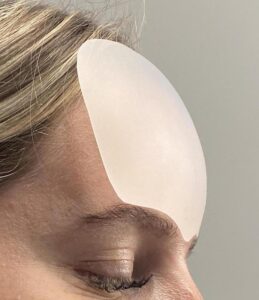 Another helpful preoperative aide in forehead implant size selection is to place the various forehead implants sizes directly on her forehead. This can allow the patient to quickly provide input as to what looks best to them.
When increasing forehead roundness/convexity there will be some slight decrease in the vertical inclination of the forehead. Patients should be so advised before surgery.
2. Incision and Pocket Dissection
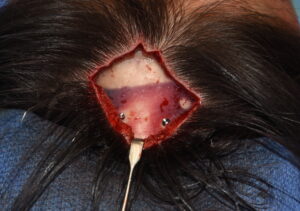
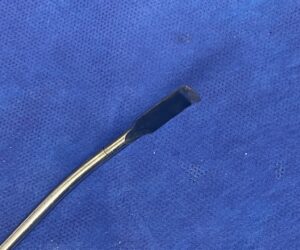 Incisional access is done from a superior approach with a small scalp incision either at the frontal hairline or just behind it. (Don’t get too far behind the transitional curve between the upper forehead and the top of the skull) After direct infiltration with a 1% lidocaine and 1:100,000 epinephrine solution for hemostasis into the planned 3 cm long incision, a scalpel is used to make the dissection down past the level of the hair follicles. Electrocautery is used beyond this level down to the bone through the periosteum. Subperiosteal dissection is done with an elevator inferiorly onto the forehead. My preferences is to use a wide endoscopic dissector which is made for this purpose.
The pocket is developed in a visual and bimanual palpation technique. With the outline of the implant drawn into the forehead as to its exact location, the subperiosteal dissection is done observing through the skin the path of the elevator and using one’s ‘smart hand’ on the outside of the forehead to ensure that the dissection and pocket development does not go too low onto the brow bones or much beyond the bony temporal lines on the sides of the forehead.
3. Implant Introduction and Placement
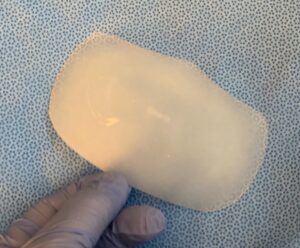
 Made of solid silicone the forehead implant can be easily rolled into a tubular shape for introduction through the small scalp incision. In rolling the implant for insertion it is important how the roll is made. It should be made along the longest dimension of the implant which is its width. This creates an implant roll that is long but has the most narrow width. This means the implant is introduced at a 90 degree angle to how it needs to be oriented for proper placement once inside the tissue pocket.
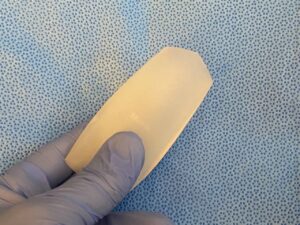
Once inside the pocket the implant needs to unrolled and turned for correct placement. This is done by a combination of a broad elevator underneath the implant in the pocket and external visualization as to how the shape of unrolled implant is looking. In the end the implant must be fully unrolled so it is completely flat and then it can be oriented as per the outlined markings on the external forehead skin.

 Ideal implant placement in a female is down over the brow bones (but not beyond) and centered with glabellar extension in the midline. Whether it should be slightly higher depends on what looks best from the outside. In males the implant would stay just above the brow bones with the glabellar extension into the glabellar valley between the medial brow bones.
4. Implant Fixation and Closure
 Depending upon the distance of the implant from the incision, screw fixation may or may not be possible. Given the size of the implant over the forehead and with good pocket development I do not consider screw fixation of the implant essential.The stability of the implant’s intraoperative position relies on the extent of the pocket dissection and the non-slippery implant’s surface against the bone. If screw fixation is capable of being used one or two 3.5mm self-tapping screw is sufficient.
After irrigating out with an antibacterial solution a two layer closure is done, a 4-0 resorbable suture for the deeper tissue and a running 5-0 plain suture for the scalp skin. No drains are needed. A circumferential head wrap is then applied.
5. Postoperative Care
 The head wrap is left in place for 24 to 48 hours which thereafter can be removed and discarded. The patient can shower the next day and shower and wash their hair the following day. Oral antibiotics are provided for one week after the surgery. There will be some swelling that peaks two days after the surgery and is largely gone two weeks later.. Between the resolution of the swelling and the time required for the overlying tissues to shrink down around the implant and stick to the bone it will be 6 weeks after the surgery until the final aesthetic result is seen.
Dr. Barry Eppley
World-Renowned Plastic Surgeon