
Volume-assured augmentation of the upper midface is currently able to be done by two basic type of implants, cheeks and infraorbital styles. They both have a role to play which becomes more challenged when the midface augmentation is a three-quarter one…this means achieving a combined infraorbital and cheek augmentation effect. When this need arrives the best approach is a custom infraorbital-malar implant design.
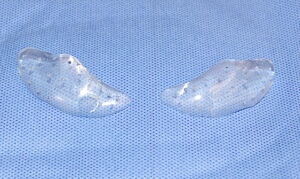
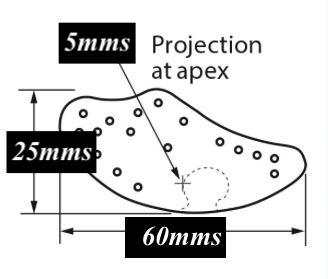
 Short of a custom implant approach the use of the extended infraorbital implant can be useful in this type of midfacial augmentation. What is unique about this standard implant is its length and shape. It was originally designed to treat tear trough deformity, nasojugal grooves and malar deficiencies. As a result of its bone surface area coverage it has been called the comprehensive suborbital implant. With a horizontal length of 6cms and a height of 2.5cms, it can cover a lot of midfacial area.
 It can be positioned so the it covers the entire infraorbital region with a little anterior malar coverage or it can be moved further out onto the cheek getting more malar than infraorbital augmentation. While it does not saddle the infraorbital rim like a custom implant design does, it can be moved a bit upward to do some limited raising of the infraorbital rim. Because of its long linear design it can create the high cheekbone look when out more towards the cheekbone.
One of the unique uses of this suborbital implant is as part of a midface rejuvenation strategy. The cheeklift is a well known midfacial enhancement procedure. But lifting the soft tissue cheek pad never adds volume and can even create a flattening effect. That can be overcome by using this implant as a component part of the cheeklift.
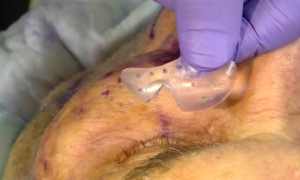
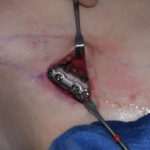
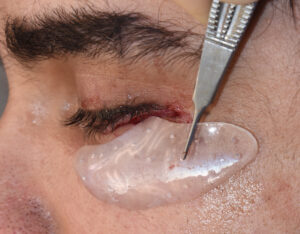
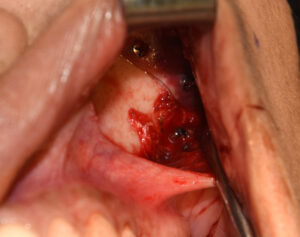
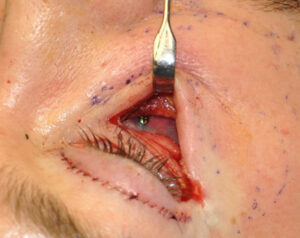 The technique is to approach the midface lift through a transcutaneous subciliary lower eyelid incision. After the skin-muscle flap is developed down to the infraorbital rim the periosteum is incised and the cheek tissue elevated off of the bone way out along to the zygomatic arch. Subperiosteal dissection is done around the infraorbital nerve as well. Once released the implant can be placed on top of or around the infraorbital nerve based on whether a large notch is placed into the implant or an eyelet made to encircle it. (the former is usually preferred) I prefer a single 1.5mm self-tapping screw fixation of the implant to the bone. Whether one places the screw through the infraorbital section of the implant or out more laterally depends on the location of the implant. The screw does more than just prevent the implant from shifting later, it also compresses it to the bone making for a smooth fit and minimizes external palpability.
The cheek lift is performed on top of the implant by anchoring the tissues to a drill hole in the lateral orbital rim. The cheek can also be sutured to the implant as an extra supportive layer beneath the bone fixation lift. This is followed by a canthopexy, anchoring either the tendon and/or lateral reticular tissues to the orbital rim periosteum.
![]()
![]()
 When one only wants the extended infraorbital-malar implant to do the lift, a transconjunctival or an intraoral approach can be used. This can be best thought of as an alloplastic or implant-driven checklist. Of the two the transconjunctival approach is the more difficult due to the smaller incision but screw fixation of the implant can still be done. The intraoral approach is challenging in terms of getting the implant up and around the infraorbital nerve. But screw fixation is easier over the cheekbone.
Dr. Barry Eppley
Indianapolis, Indiana