

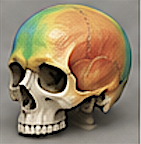
One of the most successfuk forms of aesthetic skull surgery is augmentation using a custom designed skull implant. Enlargement or augmenattion of any or all of the five surfaces of the skull can be done (forehead, top of head, back of head, sides of the head) with designs only limited by the ability of the scalp to stretch over it. How such skull implants should be made and the design principles they should follow have not been previously described.
The geometry of aesthetic custom skull implants is driven by three interacting goals:
- Restoration of normal skull contour
- Creation of idealized craniofacial proportions
- Biomechanical fit to the patient’s existing bone anatomy
In aesthetic cranial augmentation, the implant is not simply a “filler.” It is a three-dimensional geometric surface designed to modify light reflection, silhouette, projection, and proportional balance of the head.
Fundamental Geometric Principles
1. Surface Continuity
The implant must create a smooth transition between native bone and augmented region.
Key concepts:
- Tangential blending
- Implant edges should merge gradually into surrounding skull.
- Abrupt transitions create palpable or visible ridges.
- Curvature continuity
- The skull naturally contains compound curves.
- The implant must preserve harmonious curvature in sagittal, coronal, and oblique views.
This is essentially an industrial design problem applied to anatomy.
2. Convexity and Projection
Most aesthetic skull implants increase convexity.
Examples:
- Occipital augmentation ? posterior projection
- Temporal augmentation ? lateral widening
- Vertex augmentation ? superior height increase
- Parietal augmentation ? broader upper skull
The geometry is defined by:
- Maximum projection point
- Radius of curvature
- Transition zones
- Symmetry across midline
Even a few millimeters dramatically affect appearance because the skull acts as a large reflective surface.
3. Global Cranial Proportion
The implant is designed relative to the whole head, not just a local defect.
Important proportional relationships include:
- Width-to-height ratio
- Frontal-to-occipital balance
- Temporal narrowing vs fullness
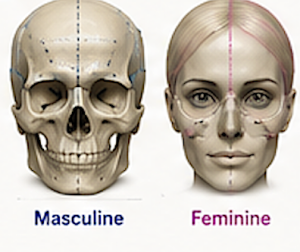
- Masculine vs feminine cranial shape
- Facial width relative to cranial width
For example:
- A masculine skull often tolerates:
- greater occipital projection
- stronger parietal width
- flatter upper curvature
- A feminine skull usually favors:
- softer transitions
- smoother vertex curvature
- less angularity
Regional Geometries
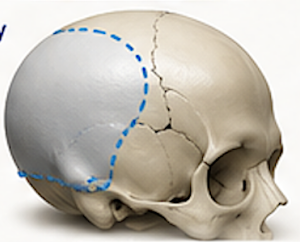
Occipital Implants
Most common aesthetic skull implant.
Primary geometric objective:
Increase posterior projection while maintaining natural posterior curvature.
Characteristics:
- Elliptical footprint
- Central maximal thickness
- Radial tapering edges
- Smooth sagittal arc
Too much localized projection produces an unnatural “bump” appearance instead of a normal cranial contour.
Temporal Implants
Used to correct temporal hollowing.
Geometry is complex because the temporal region is naturally concave.
Key features:
- Thin feathered edges
- Crescent geometry
- Controlled outward convexity
- Avoidance of over-rounding
The implant must restore a subtle convexity without producing lateral bulging.
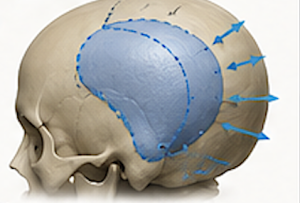
Vertex/Parietal Implants
Designed to increase upper skull height or width.
Geometric considerations:
- Large-area low-profile augmentation
- Broad curvature fields
- Midline symmetry
- Maintenance of natural cephalic index
These implants often involve very gradual thickness gradients over wide surfaces.
Thickness Distribution
Implants are rarely uniform thickness.
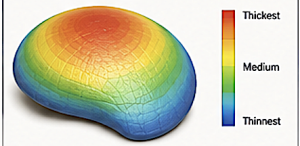
Instead they use:
- differential volumetric mapping
- gradient tapering
- vector-based projection control
Typical pattern:
- Maximum thickness centrally
- Progressive thinning peripherally
This avoids:
- visible edges
- dead space
- unnatural contour steps
Edge Design
Edge geometry is critical.
Knife-edge taper
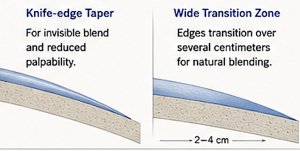
Used for:
- invisibility
- palpability reduction
Wide transition zones
Typically several centimeters.
The larger the implant:
- the more gradual the edge transition must be.
Symmetry vs Controlled Asymmetry
Human skulls are naturally asymmetric.
Custom implants may:
- preserve subtle asymmetry
- intentionally correct asymmetry
- create idealized bilateral symmetry
Perfect geometric symmetry can actually look artificial.
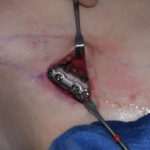
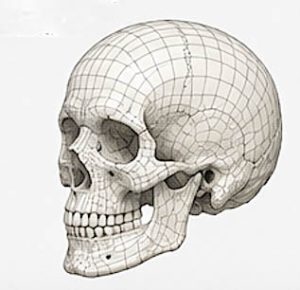
Digital Design Process
Modern custom skull implants are created from CT-based 3D reconstruction.
Workflow:
- CT scan acquisition
- Segmentation of cranial bone
- Creation of 3D skull model
- Surface analysis
- Virtual augmentation sculpting
- Thickness and edge refinement
- Implant manufacturing
The geometry is manipulated using CAD software similar to aerospace or automotive surfacing systems.
Mathematical Nature of Skull Implant Geometry
The implant surface can be thought of as:
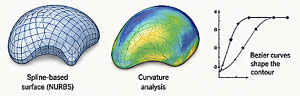
- a spline-based surface
- with continuous Gaussian curvature
- blended into an irregular biological shell
Important geometric tools include:
- Bézier curves
- NURBS surfaces
- curvature maps
- mirror symmetry algorithms
- surface smoothing filters
Materials and Geometry
Material properties influence design.
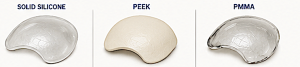
Solid silicone
Allows:
- smooth sculpted geometry
- soft edge tapering
- flexible insertion
PEEK
Allows:
- rigid precision geometry
- exact bone conformity
- thinner structures
PMMA
Can reproduce complex contour but is less forgiving intraoperatively.
Aesthetic Success Depends More on Shape Than Size
A common misconception is that larger implants produce better results.
In reality:
- contour flow
- proportional integration
- curvature harmony
matter far more than raw projection.
A 6 mm well-designed implant often looks more natural and aesthetically effective than a poorly shaped 12 mm implant.
The Most Important Principle
The best aesthetic skull implant is usually one that:
- cannot be identified as an implant,
- simply makes the skull appear naturally well-shaped.
The geometry succeeds when observers perceive:
- balance,
- proportionality,
- and normal anatomy rather than augmentation.
Dr. Barry Eppley
Plastic Surgeon